You now have the power to edit almost all of your system generated emails whenever you'd like and as many times as you want with Email Editor. Right now, you can edit all emails except the reminder email for virtual events. Look for that capability soon! Need to edit that one now? Send us an email.
Getting started is really easy! We'll walk you through everything below. Use the links here to navigate to a particular section of the article.
Table of Contents
The Email Editor Wizard Diagram
How to Use the Email Editor Wizard
Getting Started
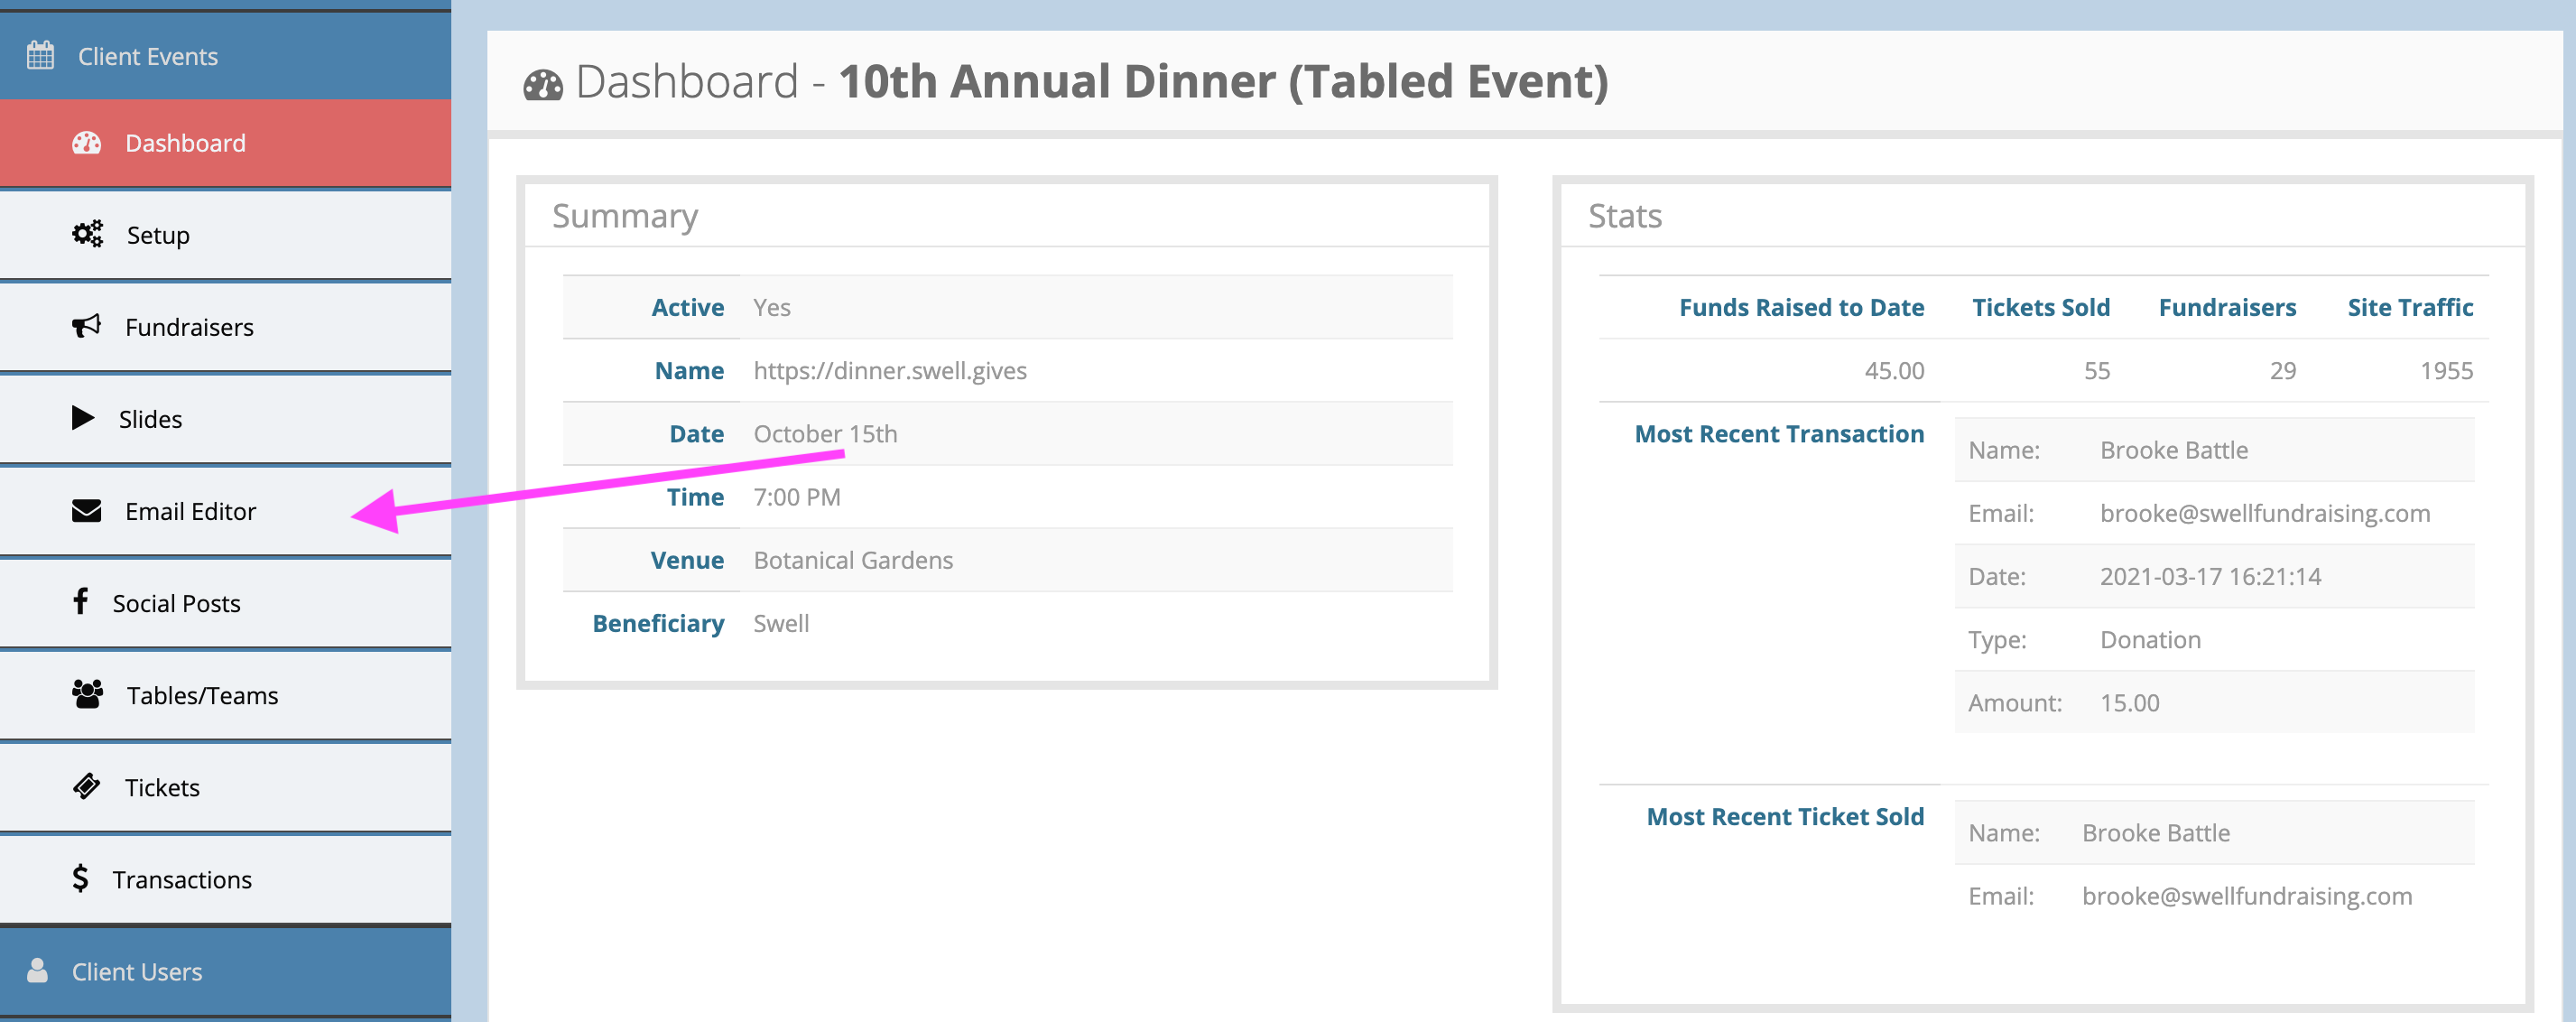
Open your event in the Swell dashboard and click the Email Editor button from the left-hand menu.

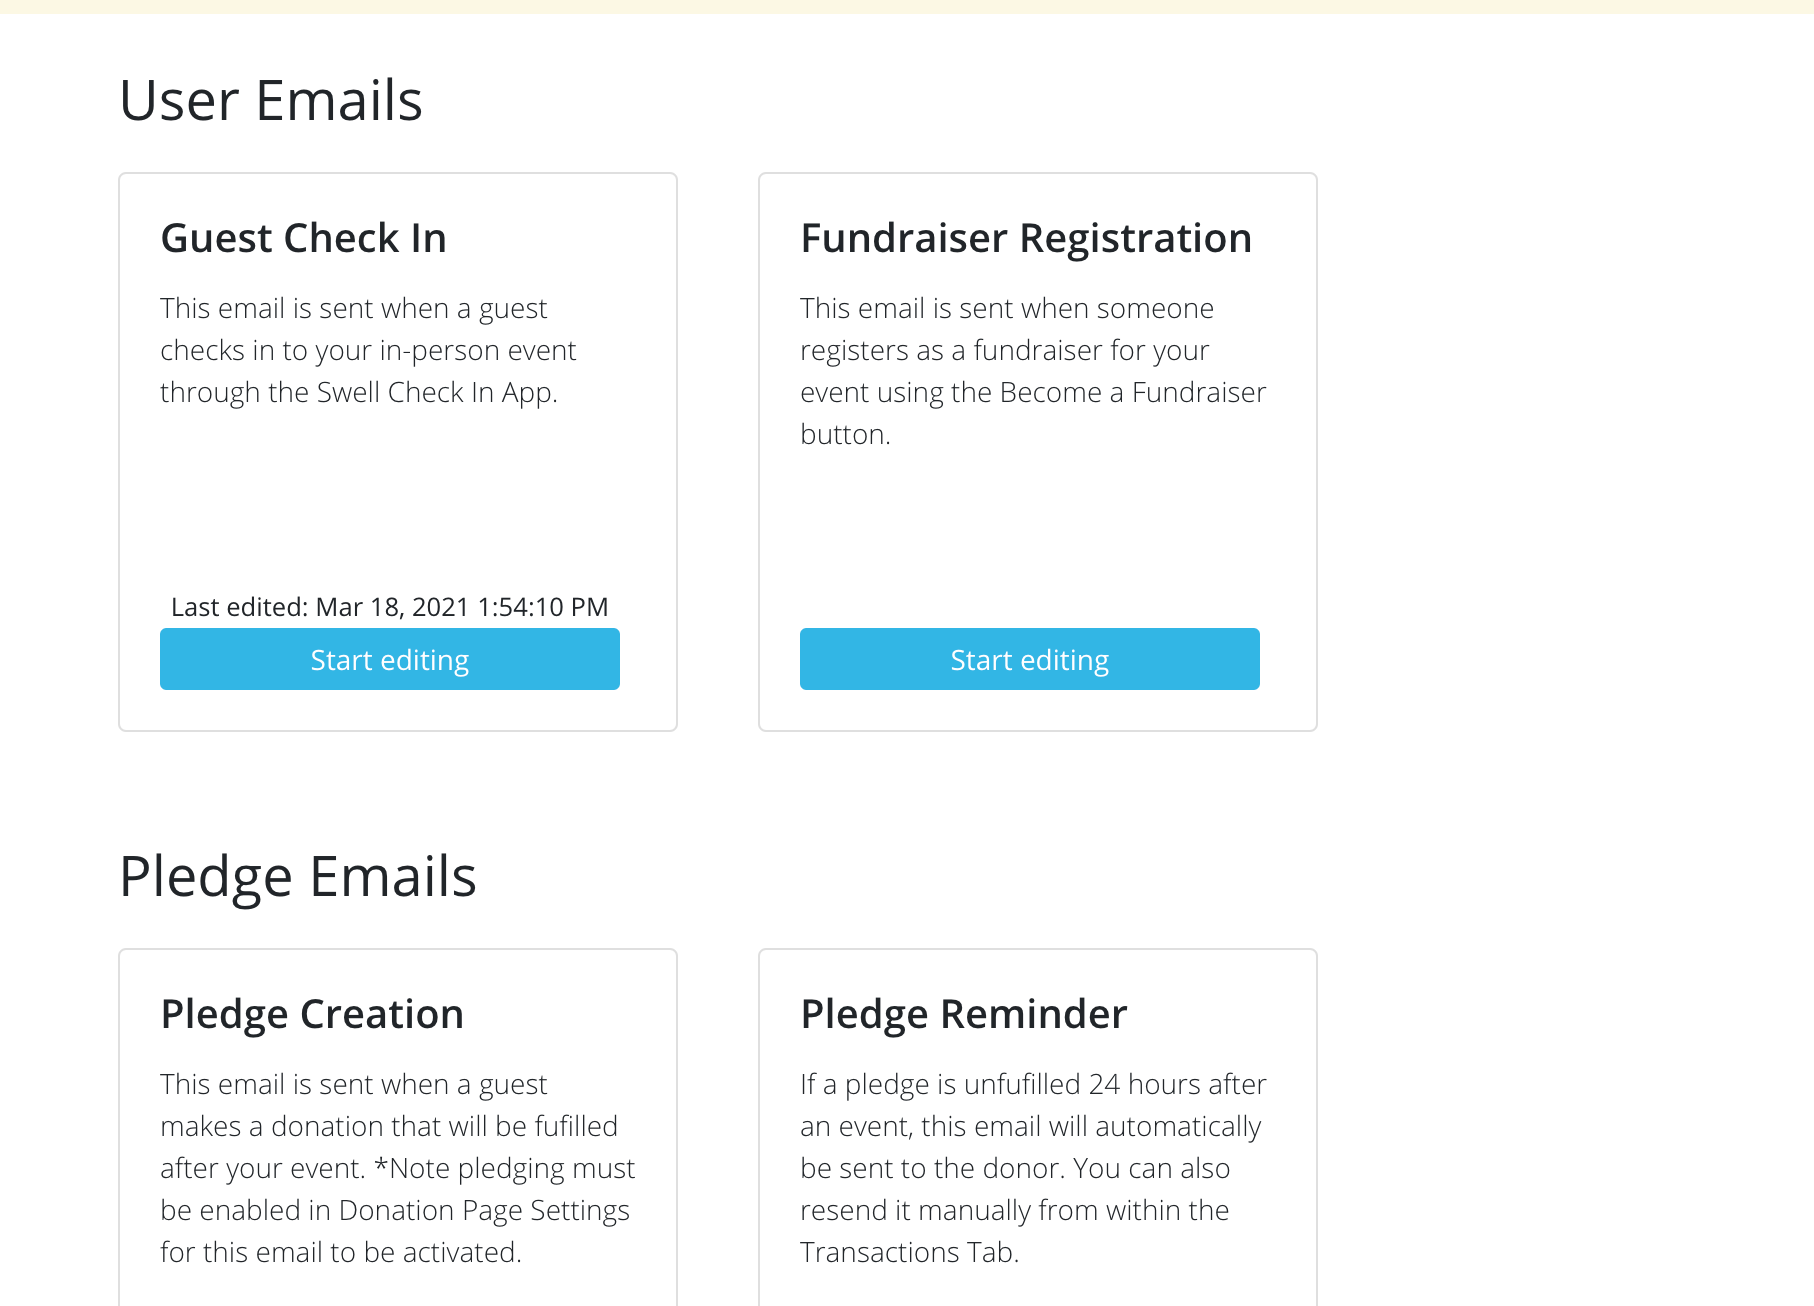
The emails available to edit will appear in sections with descriptions to help you choose the right one.
Only the emails you need will appear in this list. For example, if your event isn't using tickets, you won't see any of the ticketing or table emails in your Email Editor because you won't be using those products.
At this time, the only email unable to edit in the email editor is the one-hour reminder sent out for virtual events. If that is the email you are trying to edit, please email us.
Use your browser's scroll bar to find the email you would like to work on and click the blue ![]() button .
button .
The Email Editor Wizard Diagram

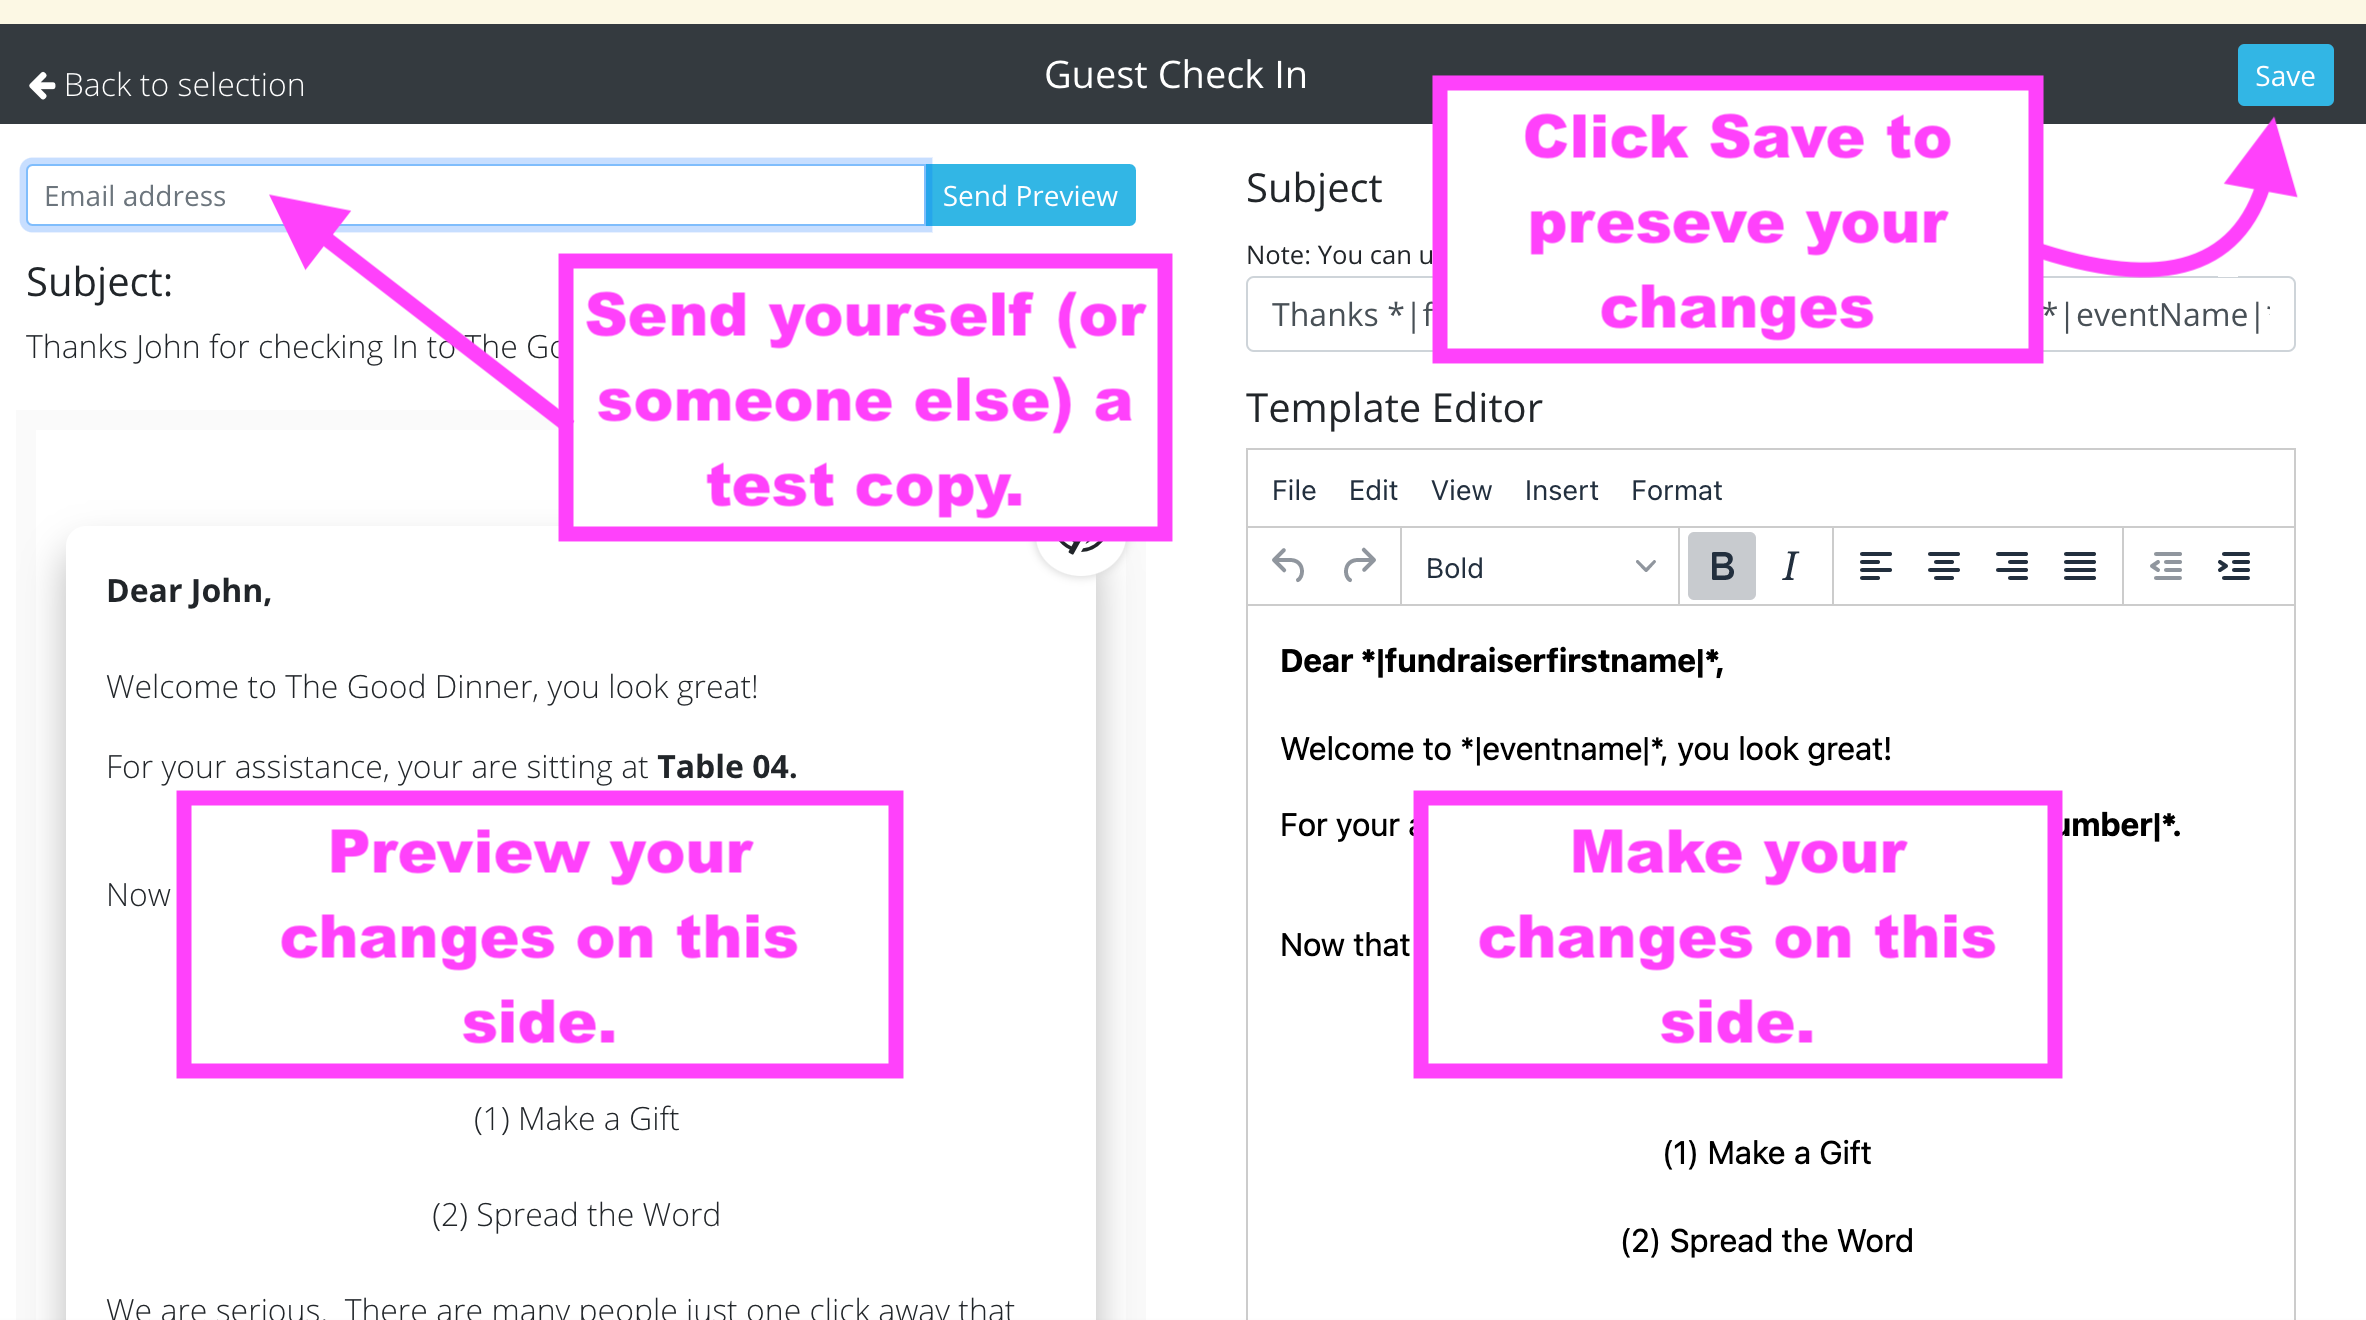
The Email Editor Wizard is split into two sections. The panel on the left will let you preview your changes as you make them while the panel on the right will let you type in your edits. Note: The preview screen on the left will show changes as you make them, but your edits are not final until you click the blue Save button in the upper right-hand corner of the Email Editor.
How to Use the Email Editor Wizard
- To make changes, click into the section you would like to edit in the preview pane on the left.
- Type your changes to the subject line and email body in the editor pane on the right.
- You can use merge tags to pull in information like your URL, event time, your fundraiser's first and last name, etc by using the grey tag buttons at the bottom of the edit panel. Note: we'll be putting a glossary of tags in this article soon. In the meantime, if you need help with tags, send in a support ticket and we'll be happy to help you navigate them.
- If a tag is missing from the buttons at the bottom, it isn't available for the particular email you're editing.
- To use tags, simply click where you want the tag to appear in the editing panel (on the right). Without clicking again, scroll to the bottom of the editing panel to find your tag and click it to make it appear in your email.
- To remove a section from your email, click the eye
 button in the left-hand panel. When the section is hidden, the button will change to
  . Press it and Save if you've changed your mind about hiding the section.
 - For ticket emails, you also have the option to remove the pdf ticket. Simply remove the check mark below the subject line in the right-hand panel to remove it.

- Once your email looks just right, scroll back up to the top and click the Save button in the right-hand corner.

After you've saved your changes, you can send yourself a test copy if you would like. Just fill in your email address in the bar in the top left corner and click the blue ![]() button.
button.
To edit more emails, click the "Back to Selection" text in the black bar on the left.

Repeat the process for any of the other emails you want to change. You can go back into an email to make additional changes at any time.
Note: For ALL Emails DON'T FORGET TO EDIT THE SUBJECT LINE. (Go ahead - do that now, first, while you're thinking about it!)
Glossary of Tags
| Tag Name | What It Does |
| Direct Donation URL | Goes to the event's donation page (the same place as the "Give Now" button) |
| The billing email address provided by the user during checkout. This can be different than the fundraiser's email address. In the Comp Code email, this is the email address to which the comp code is being sent. | |
| Event Beneficiary Name | The Nonprofit Name provided in the details tab during setup |
| Event Beneficiary URL | The link associated with the logo image in the branding tab |
| Event Date | The date provided in the details tab during setup |
| Event Hashtag | The event's hashtag set in the social settings tab during setup |
| Event Name | The event name provided in the details tab during setup |
| Event Time | The event time provided in the details tab during setup |
| Event URL | The link to your event's Swell site (example: https://myswellsite.swell.gives) |
| Event Venue | The name of the venue provided during setup in the details tab |
| First Name | The billing first name provided during the checkout process This can be different than the fundraiser's first name. In the Comp Code Email, this is the name of the person receiving the comp code. |
| Fulfillment URL | The link a donor clicks to fulfill his/her pledge |
| Fundraiser Email Address | The email address provided by the fundraiser when clicking the "Become a Fundraiser" button or the email address for your ticket holder. This can be different than the billing email address |
| Fundraiser First Name | The first name provided by the fundraiser when clicking the "Become a Fundraiser" button or the email address for your ticket holder. This can be different than the billing name. |
| Fundraiser Last Name | The last name provided by the fundraiser when clicking the "Become a Fundraiser" button or the email address for your ticket holder. This can be different than the billing name. |
| Fundraiser Profile Link | Links to the fundraiser's personal fundraising page. |
| Last Name | The billing last name provided during the checkout process This can be different than the fundraiser's first name. In the Comp Code email, this is the name of the person you're sending the code to. |
| Organization Name | This is the client's name. This can be different than the beneficiary's name and is set during the Swell signup process. |
| Product Name | The product name give to a ticket, table, or sponsorship during the set up process. |
| Promotion Code | This is the comp code set in Setup-->Comp Codes |
| Promotion Quantity | The number of tickets provided by the comp code |
| Promotion Redemption URL | The link used to redeem a comp code |
| Quantity Purchased | The number of tickets purchased in the specified transaction |
| Referring User's First Name | The referring fundraiser's first name. |
| Referring User's Last Name | The refering fundraiser's last name. |
| Referring User's URL | The referring fundraiser's personal fundraising page link. |
| Table Guest Confirm URL | The link an invited table guest clicks to confirm his/her attendance |
| Table Guest Decline URL | The link an invited table guest clicks to decline his/her attendance |
| Table Guest Email Address | The email address for the guest provided by the host during the invitation process |
| Table Guest First Name | The table guest's first name |
| Table Guest Last Name | The table guest's last name |
| Table Host Email Address | The table host's email address |
| Table Host First Name | The table host's first name |
| Table Host Last Name | The table host's last name |
| Table Management Link | The link a table host uses to manage invitations to his/her table |
| Table Name | The table's name (Ex. Smith Table) |
| Table Number | Table numbers are set in the settings for each table. If you've configured them, this tag will let you input the number into an email. |
| Table Profile URL | The table/team's profile page shows all confirmed guests and the table's fundraising stats. Use this tag to send it to table guests or hosts. |
| Table Type | The product name given to a table during the setup process. This is different than the table name (Example Table of 10). |
| Ticket Code | The ticket holder's ticket code for entry into virtual events. |
| Ticket Parent Product Name | The product name give to a ticket during the set up process. |
| Ticket Price | The price set for a ticket in the product setup process |
| Ticket Seat Number | If you've assigned seats to table guests, you can use this tag in the check in and physical ticket emails. |
| Total Seats | The number of seats a table can hold |
| Transaction Address | The billing mailing address provided during the checkout process |
| Transaction Amount | The total amount of the transaction. Donation and purchase transactions are sent in separate emails. |

Comments
0 comments
Article is closed for comments.