Would you rather watch a video than read the article?
Note on terminology: Don't let the term "event" confuse you because you're not hosting a physical event. When the term event is used in this article, it refers to your online fundraising event. Fundraiser refers to a person who is raising money for your cause through your online fundraising event, not the event itself.
This article covers:
- Finding Your Event in the Dashboard
- The Setup Menu
- The Details Tab
- The Branding Tab
- The Content Tab
- The Social Networks Tab
- The Sponsors Tab
- The Groups Tab
Finding Your Event in the Dashboard
Now that you've created your online fundraising event, you can customize it by adding details, branding information, your social networks, and extra content pages. We'll go through each one at a time.
Log in and find your event by selecting Browse Events. Choose the event you would like to set up.
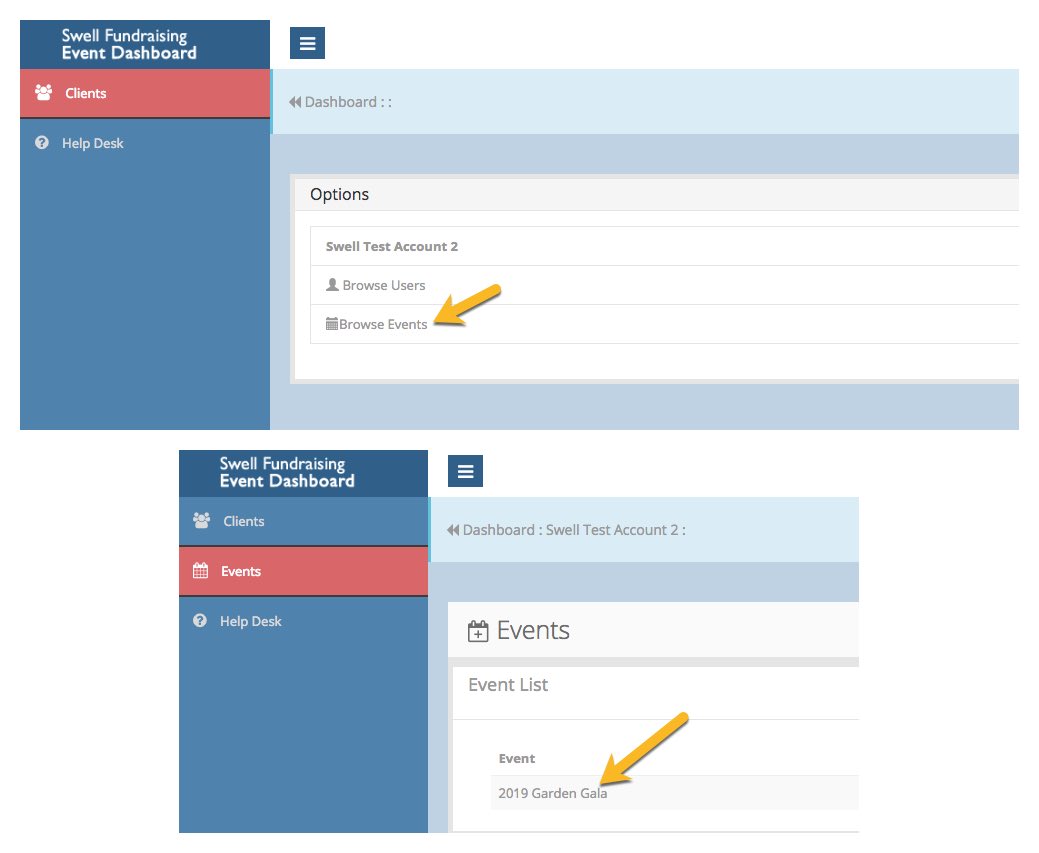
The first screen you'll see is your Dashboard. You'll be able to monitor your site's statistics as your event progresses. For now, you can use it to see what your site will look like as you're working on it. TIP: If you right click on your link, you can open it in a new window and leave it open while you work. That way, you'll be able to see your progress as you're working through the setup process.
Return to Top
The Setup Menu
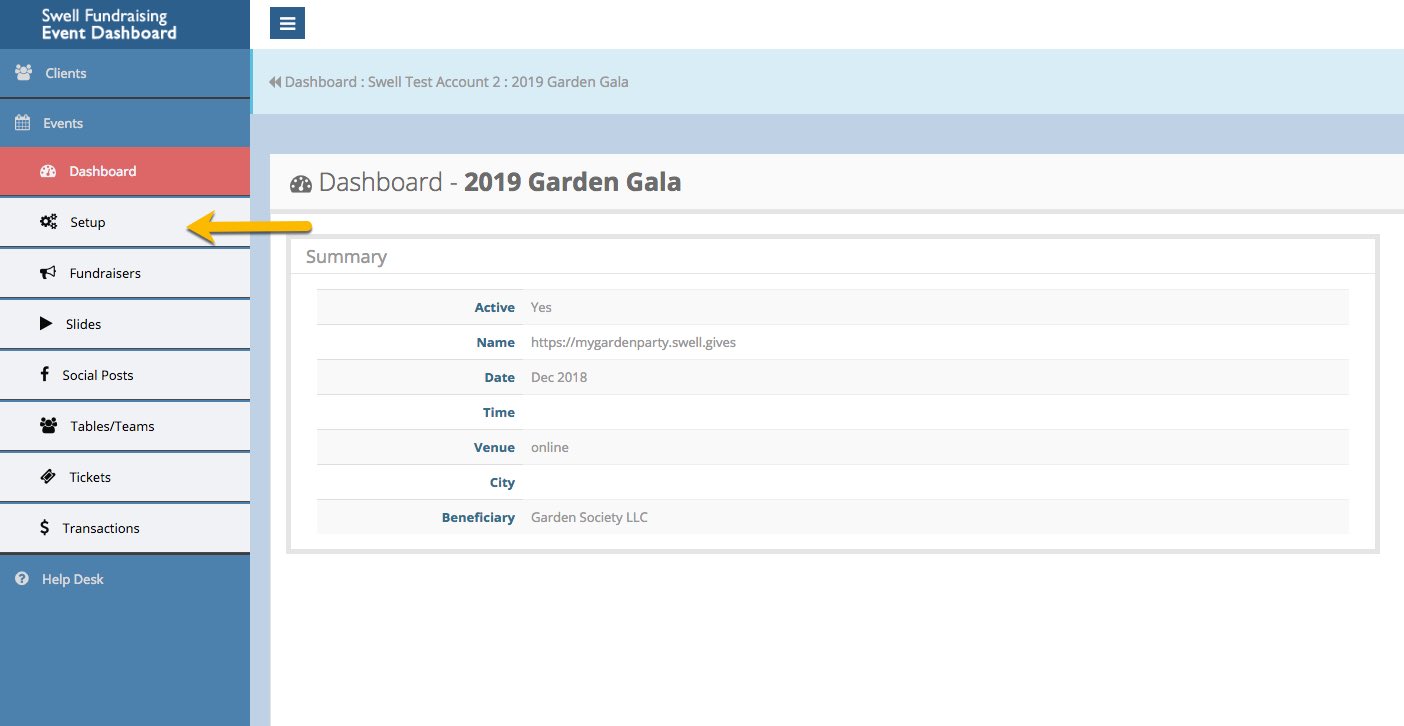
When you see this screen, click Setup from the menu to the left.
Return to Top
The Details Tab
On the next screen, you'll see the where to type out details about your event. The screen looks like this:

- Who: This is your organization's name as it will appear on emails sent from the Swell system and on your guests' receipts.
- What: This is the name of your event. You set both who and what in the event creation popup, but they can be easily changed here in case you change your mind.
- Description for Fundraising Pages. Everyone who donates through your Swell site automatically receives their own fundraising page. The text you type in this box will appear on all of those pages.
Once you've entered all of your information in the Details Tab, click the Save Changes button. Now, it's time to move to the Branding Tab.
Return to Top
The Branding Tab
In this tab, you can customize your site by adding your own images. For all images, upload your files in JPEG (.jpg) format and use the blue button to search your computer for images.

The Event Page Header image and the Beneficiary Logo image both appear on your event's website. The Profile Page Header image is displayed on your personal fundraisers' pages. Some organizations choose to upload the same image for their Event Page Header and Profile Page Header while others choose to use different images. The choice is yours. See the graphics below to get a visual sense of where these images appear on your pages.
This page is the event site. It displays the Beneficiary Logo and the Event Page Header.
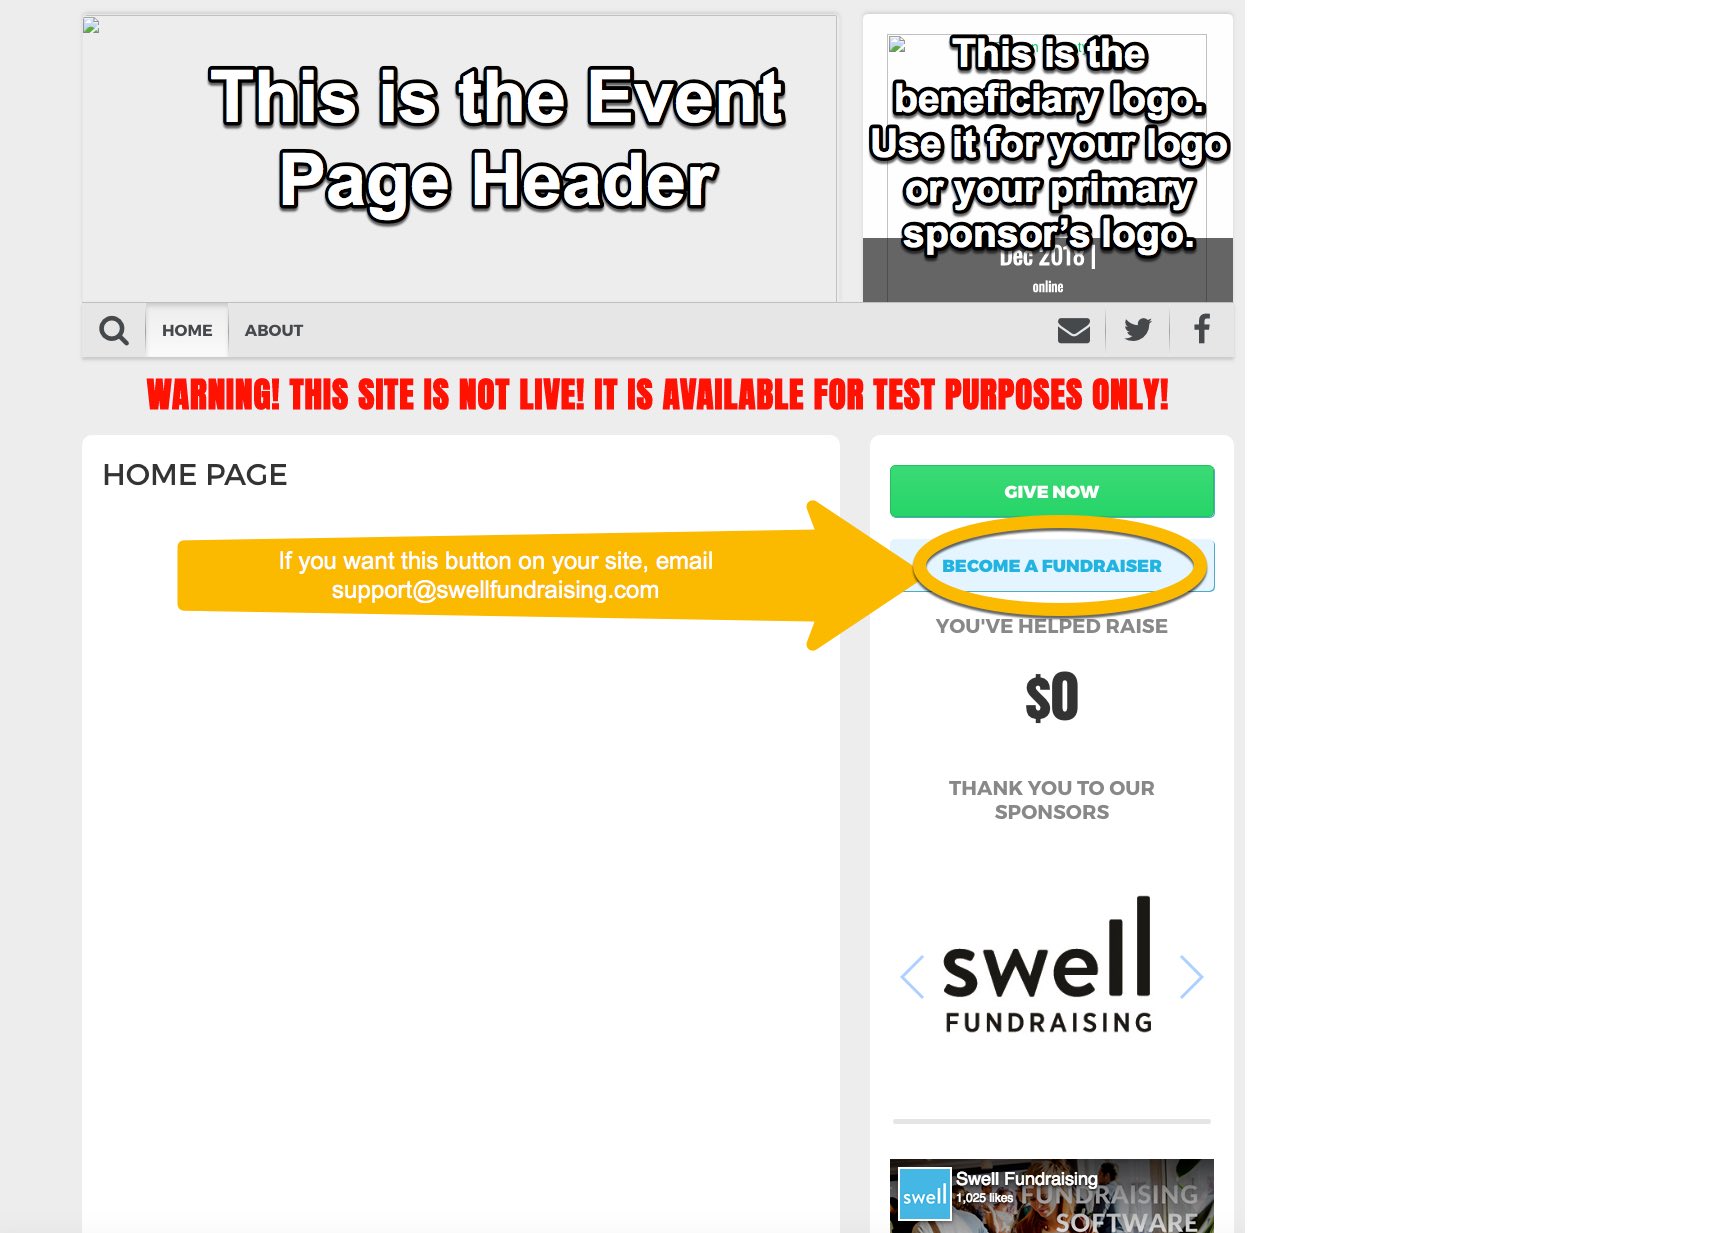
Some organizations choose to use the Beneficiary Logo area to feature their event's primary sponsor. The Branding Tab provides a space to include an outbound link to your sponsor's website in case you decide to use the space in this way. You can also put your organization's logo here or use the space for anything else you dream up.
This is the personal fundraiser page. It displays the Profile Page Header.
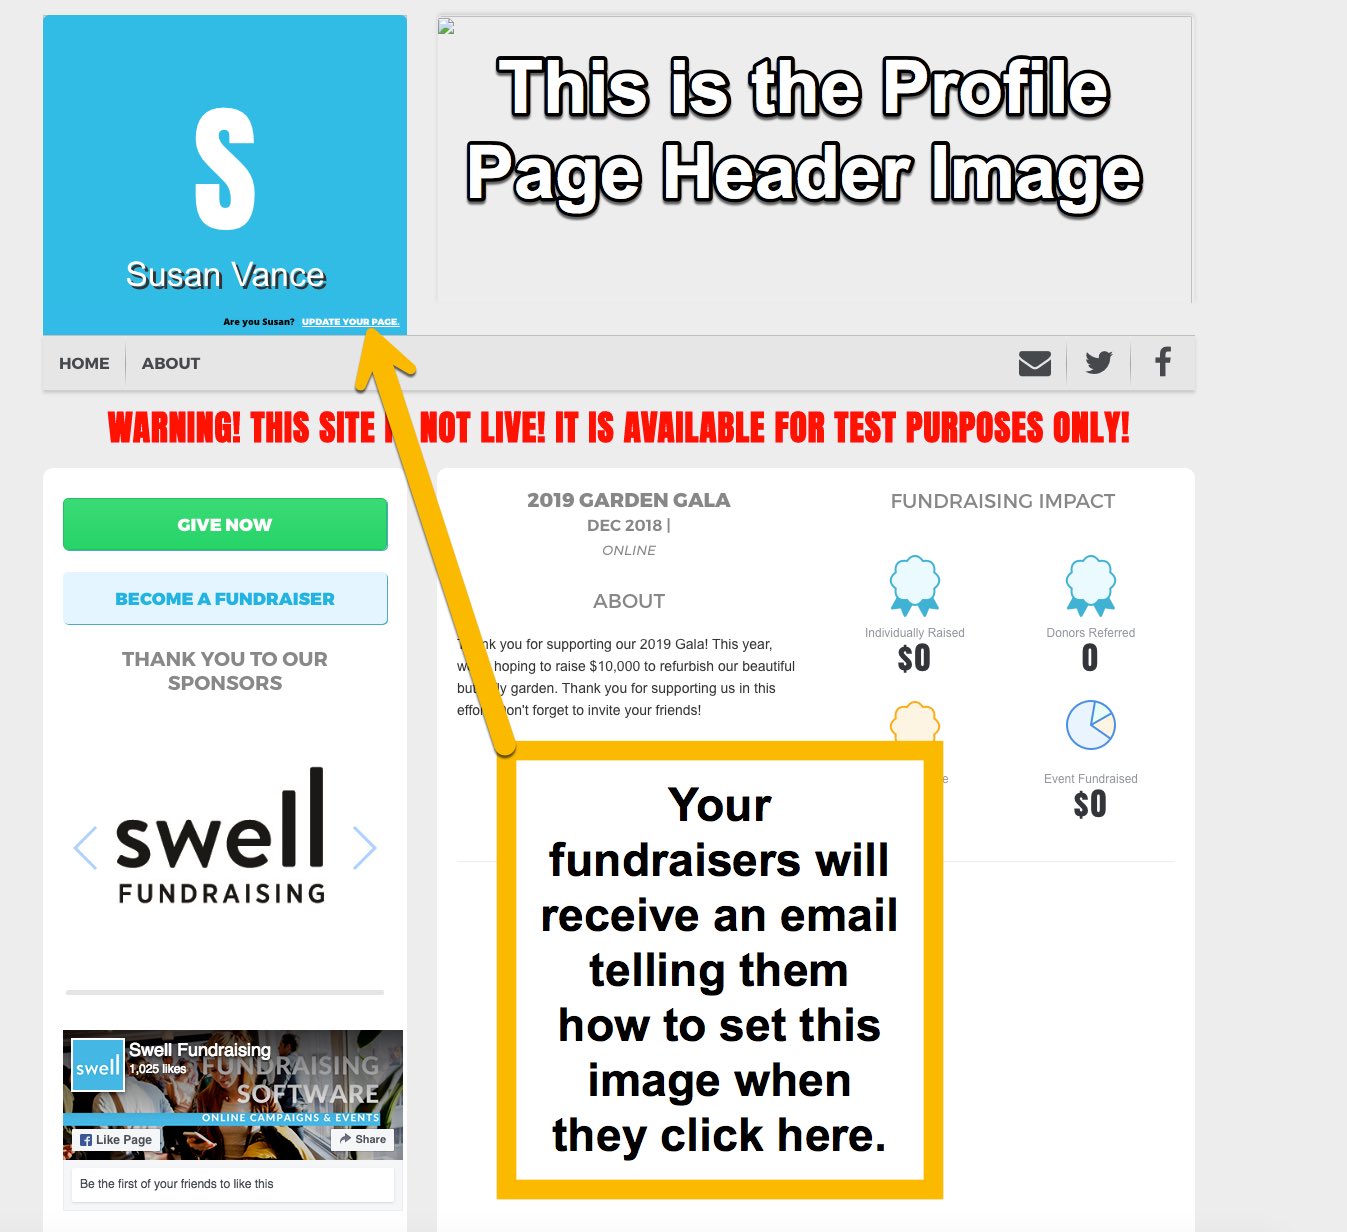
Your fundraisers choose their own image for their personal fundraiser pages. When they click the link, they will be prompted to enter their email address. The system will then send them an email with a unique link to set the profile image on their personal page.
The final image to set in this Branding tab is the Email Header image. It will appear at the top of the emails Swell sends on your behalf.
Once you've uploaded all of your branding images, click Save Changes to save your work. You can return to this section to change out your images any time you like.
TIP: The placeholder images in the dashboard give the size specifications for each image. If you don't have a graphics program, try Canva. Canva makes it easy to create custom-sized images.
Return to Top
The Content Tab
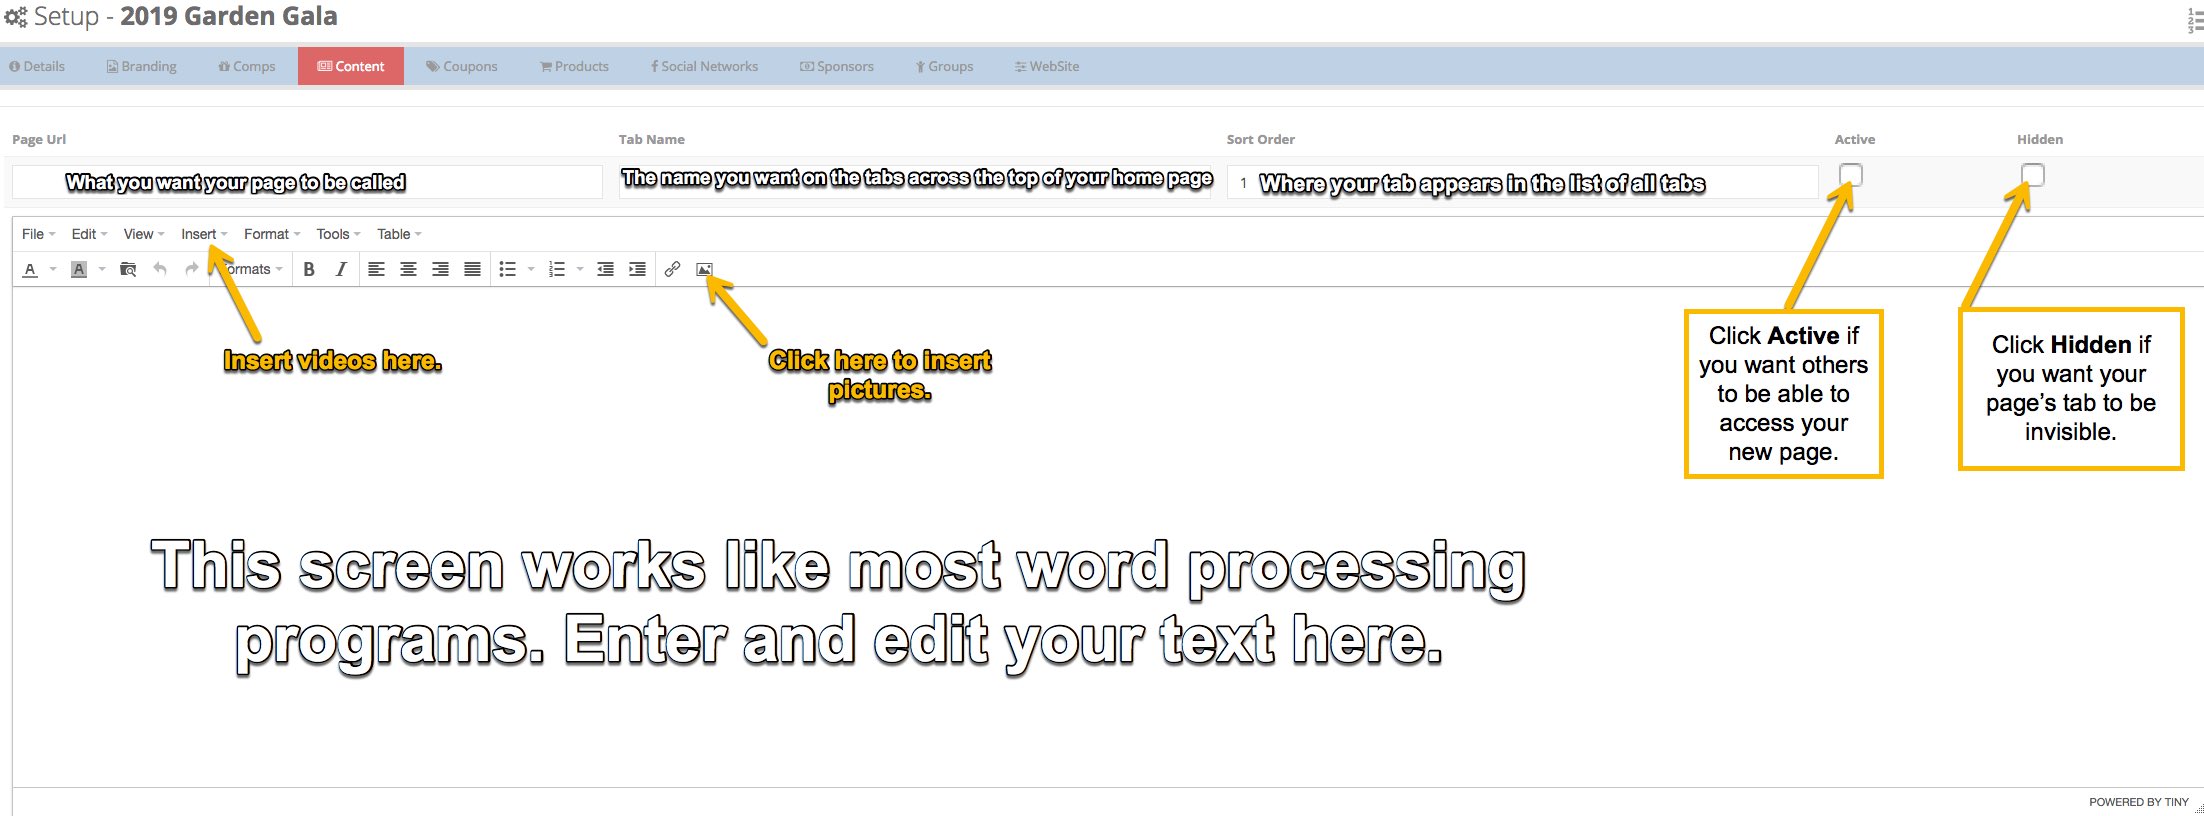
The Content Tab is where you add pages to your event's site. The first one, Home, is done for you. Additional pages are not required, but if you would like to add them, here's how.
- On the Content Tab, click the green plus sign.

- Fill in the Page URL. This is the part of your page's web address that comes after the slash (example: mygardenparty.swell.gives/about). Use a lowercase word or short phrase with no spaces.
- Next, decide what you would like the tab to be called. This field can contain capital letters and spaces, but should still be on the shorter side.
- Sort Order describes the order in which your new page will be displayed on your tabs menu. Home is generally 1, but you can put another page in front of it by setting the page order to 1.
- If you're still working on constructing your page and don't want others to see changes being made as you're working, leave the Active box unchecked.
- If you don't want the tab name to display in your tabs menu, check Hidden. Your page will still be accessible with the full address (mygardenparty.swell.gives/about), but visitors won't be able to click a tab to get to the page.
- The large box is where you create the content for your page. Most of the buttons on this page are self-explanatory. Because it's easy to miss them, we highlighted how to insert images and videos in the graphic below.
- Once you're done creating your page, click the blue Save button at the bottom of the screen.
Once you save, you'll be returned to your list of pages in the content area. If you want to make a change to or delete an existing page, use the pen button or the x button.  The pen button will allow you to make changes. The x will delete your page.
Return to Top
The Social Networks Tab
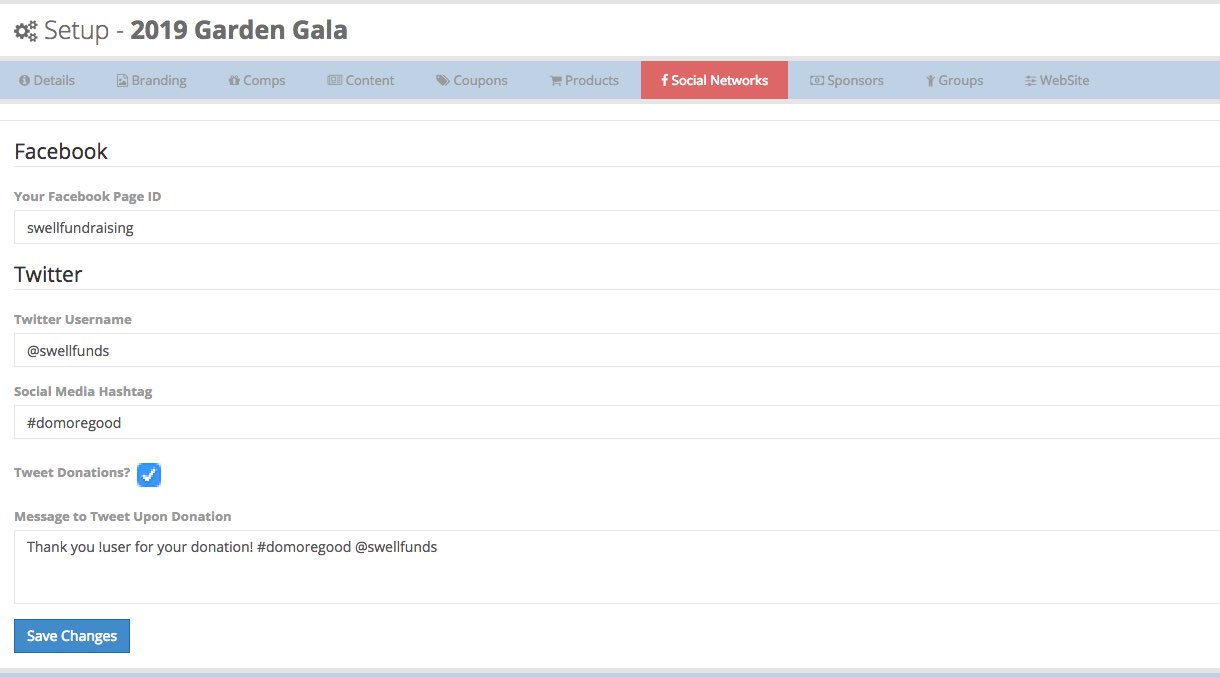
Expand the reach of your event by including your social media networks.
Your Facebook Page ID can be found by looking at the address bar of your web browser while you're on your Facebook Page. It is the portion of the address that comes after facebook.com.
Make sure you include the at (@) symbol when you fill in your Twitter Username.
Choose the hashtag you would like to use for your event on Twitter and Instagram. Type it (including the # symbol) in the Social Media Hashtag blank.
When someone donates to your event, you have the option of tweeting out a thank you message. If you would like to do this, check the Tweet Donations box and write out the message you would like sent.
Note: The !user tag in the default message pulls the donor's first name into your tweet. It's a good idea to include your hashtag and Twitter Username here as well. You might also choose to include your sponsors' Twitter Username so they will be mentioned as well. Although you can certainly type more, remember tweets are better if they're on the shorter side.
Return to Top
The Sponsors Tab
If you have event sponsors, you can add them here. Sponsors in this area will scroll at the bottom of every page on your site.
Click the green plus sign  to add a sponsor. A screen will pop up where you can fill in all of your sponsor's details.
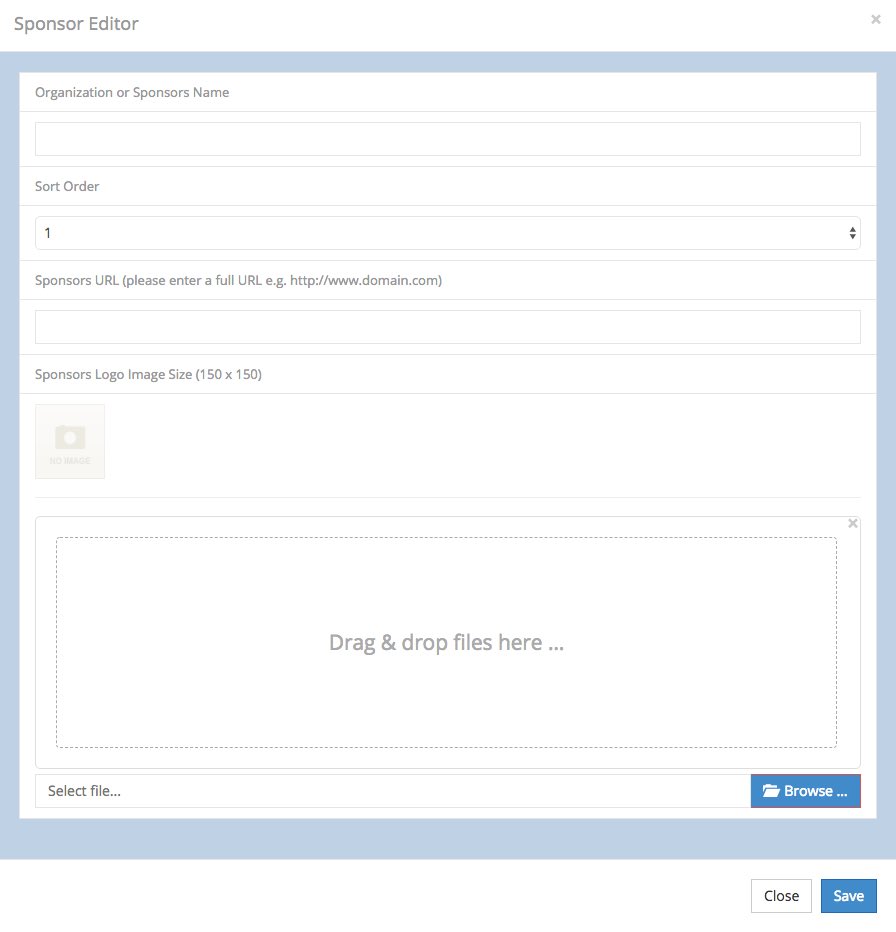
Here's how to use that screen.
- Type the name of the Organization or Sponsor exactly as you would like it displayed in the first box.
- Your event site and fundraiser pages will show a loop of sponsor logos. If you want logos to appear in a specific order, set it in Sort Order.
- In the Sponsors URL field, please enter the complete web address for your sponsor including https:// and www. This is an outbound link. If visitors to your site click it, they will be directed to your sponsor's website. This is a great selling point when you're trying to recruit sponsors for your event.
- Upload your Sponsors Logo sized to 150 pixels by 150 pixels in the drag and drop area or upload the logo using the Browse button.
- Click Save. Your newly added sponsor will appear in the list on the Sponsors Tab.
If you change your mind about adding a sponsor while you are in the popup, you can click the close button. Your sponsor will not be saved. Once you've created a sponsor, click the pen/paper icon next to the correct sponsor in your sponsor list to edit it or the X icon to delete it  .
.
Return to Top
The Groups Tab
If you would like to participate in Team Fundraising, you can create teams in the Group Tab. Group creation and editing works in much the same way as with items in other modules. Click the green plus sign to create a group, the pen and paper to edit, and the x to delete.
If you create groups for your event, fundraisers will be asked to choose a team when they register. If you turned leaderboards on during the event creation process, a team leaderboard will be added to your homepage when you create groups.
Comments
0 comments
Article is closed for comments.